FAQ 2 – old
Frequently Asked Questions
FAQ pages: [ Page 1 | Page 2 | Page 3 ]
Q. When I attempt to start the client application I get an error message box ‘Unable to connect to server using provided settings…’. What should I do?
A. This error can normally occur for one of several reasons:
| Reason | Corrective action |
| A firewall or anti-virus software is preventing the client from connecting to the CashView configuration service or from the CashView SQL server DB (even if these services are running on the same PC) | Check that your firewall or anti-virus software is up-to-date and configured to allow CashView to access the network ports described in the CashView installation manual. |
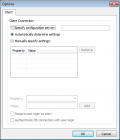
 After clicking ‘Yes’ on the error message box to check settings, a blank Options page is displayed. After clicking ‘Yes’ on the error message box to check settings, a blank Options page is displayed. |
Depending on your network configuration, the CashView client application may not be able to auto-discover where the CashView services are installed. In this event, tick Specify configuration server and input the name or IP address of the PC where the CashView services are installed. Click OK to retry the connection.If this is a standalone installation (i.e. Both client and server installed on the same PC), simply retry the connection attempt by clicking OK on the Options screen.For more detailed information refer to the Troubleshooting section in the CashView Administrator manual. |
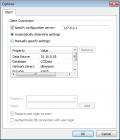
 After clicking ‘Yes’ on the error message box to check settings, an Options page is displayed and appears to contain the correct settings. After clicking ‘Yes’ on the error message box to check settings, an Options page is displayed and appears to contain the correct settings. |
For an installation using the typical settings, confirm that the Microsoft® SQL Server package was installed correctly by checking Add or Remove Programs for an entry similar to Microsoft SQL Server 2005. Verify that the SQL server service is started by navigating to Control Panel > Administrative Tools > Services and finding an entry similar to ‘SQL Server (VOLUMATIC)‘. Check that this service’s status is marked as ‘Started’.(As of R1.4, you can ensure that the CashView DB and DB user were setup correctly by accessing the Volumatic Services Setup tool, selecting the Client tab and pressing the Add CashView DB user button.)For more detailed information refer to the Troubleshooting section in the CashView Administrator manual. |
Q. How do I setup CashView to automatically delete old data?
A. Open the Volumatic Services Setup tool via the start menu: All Programs > Volumatic > Services > Configure Cash View Services. On the Service tab, change the service setting ‘Purge old data after (days)‘ to a value other than 0.
For example, set to 90 would result in data older than ~3 months being deleted; 365 would result in data older than 1 year being deleted. Restart the gatherer service for the configuration change to take effect. CashView will now periodically purge pouch and event data that meets the required criteria. Any data in the CCi memory that is over the configured age limit will be ignored by CashView.
Note: Pouch and event data is permanently deleted from the CashView DB and cannot be recovered.
Q. How can I remove data collected from my CCi(s) from CashView?
A. For CashView versions prior to R1.4, you can refer to the Administrator Manual, Delete stored data section. This section of the documentation assumes that you are an advanced user.
Note: Following these steps will permanently delete data. Once complete, this action cannot be undone.
For CashView R1.4 onwards, an interface is now built in for deleting CCi data. To enable access to this interface:
- Login as an Engineer-level user:
- On the menu click Tools > Options. Click the Global tab.
- Add or amend the property ui.deletedata.enabled and set its value to 1.
- Click OK.
To delete device data:
- Login as an Engineer-level user:
- On the menu click Tools > Manage Devices…
- Select the CCi(s) that you want to delete historic data for (Hint: You can use Shift-select and Ctrl-select to select multiple CCis)
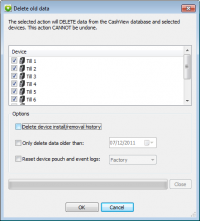
- Right-click on one of the selected CCis and choose Delete data… from the context menu. The delete data options screen will be displayed:

- To include CCi audit history (records of CCis previously added and removed) ensure Delete device install/removal history is checked.
- To limit the deletion operation to data over a minimum age ensure Only delete data older than is checked and select the required minimum date.
- To additionally reset the CCi internal memory ensure Reset device pouch and events logs is checked and select the reset type required.
- Click OK. You will receive a 2nd prompt checking you are sure you want to continue.
- The selected CCi data will be deleted from the CashView DB. This process may take several minutes depending upon the number of CCis selected and the date range of data to delete.
- Once complete, a message box will be displayed. Click OK to close the window and return to the Manage devices dialog.
Q. How do I enable Operator Accountability in CashView?
A. Whilst logged in as an Engineer-level user:
- On the menu click Tools > Options. Click the Interface tab.
- Ensure Enable i-Button support is ticked.
- Click OK.
- Operator Accountability features should now be enabled.
Q. How do I enable Operator Accountability on the CCi?
A. In order to take advantage of Operator Accountability, the CCi must be fitted with the correct hardware daughter board add-on. Check the comms panel on the rear of the CCi, if the daughter board add-on is fitted there should be 2 stereo-jack sockets adjacent to the Ethernet, serial and USB ports.
Whilst logged in as an Engineer-level user:
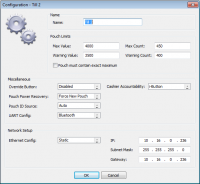
- Right-click the CCi on the plan view and choose Configure…
- Ensure that the Cashier Accountability option is set to i-Button.
- Click OK.
Provided there is no i-Button present on the CCi i-Button reader, the CCi LEDs will change to steady green. Place a Volumatic i-Button on the reader to change the LEDs to walking green permitting notes to be deposited.
Q. I have a mixed estate of CCis some with Operator Accountability and some without. How do I ensure cash totals for all units are included in my
trading report?
A. By default, when performing a Trading report for a selection of users with Operator Accountability enabled, only cash deposits for the selected user(s) will be included in the report. Any cash deposits with no associated i-Button user (i.e. True for a non-Operator Accountability CCi or CCi with OA switched off) will therefore not be included in the report. To change this behaviour:
- Login as an Engineer-level user:
- On the menu click Tools > Options. Click the Global tab.
- Add or amend the property report.trading.include_cash_with_no_user and set its value to 1.
- Click OK.
Now, when the Trading report is run, cash totals with no associated i-Button user will always be included in the report.
Q. Can I upgrade my existing CashView installation with a new version?
A. Yes. The install system for the new version of software will detect and upgrade the existing version. The latest software release should be capable of upgrading any existing installed version (including the early beta versions).
Note: Once an upgrade is complete it is not possible to downgrade an existing installation due to changes applied to the existing CashView DB. In order to use an older software version on your PC, remove the existing installation and any DB files first. Refer to the CashView Installation manual for more details.
Q. I’ve setup my CashView system with CCi(s) but when I check a CCi the tooltip just displays the message ‘Loading data please wait…’?
A. The CCi(s) have been configured and installed. CashView has been installed. The CCi(s) have been added to CashView via Tools > Manage Devices… and all show the Started status. However, one or more CCi(s) are not showing any pouch or event data in the status tooltip or when viewing CCi events.
To resolve: Using either the PDA or Site Support Tool, check the insertion time of the first pouch record (for a new CCi the log should typically contain only one pouch record). If the insertion date and time is displayed as ‘invalid’ or if the pouch appears to have been inserted in 2001 or earlier, reset the CCi pouch data using either the PDA, Site Support or CashView.
The CCi maintains a real-time clock (RTC) powered by a rechargable backup battery. It is possible in the case of long-term storage for the battery to become discharged causing the current time to be lost. Only on initial power up may pouch and event data therefore be stored with the incorrect time. CashView, by default, will synchronise the CCi time such that, once the pouch data has been reset, new pouch and event data will be stored using the correct time. The RTC battery will continue to be recharged whilst the CCi unit is connected to the mains supply. Refer to the CashView Administrator manual for data reset instructions.
Q. After installing a new CashView client, I get an error stating that
too many clients are installed for my CashView license. How do I re-use
the existing license allocation?
A. In this situation you need to move your existing CashView client installation. This could be due to either a replacement PC or re-structuring of your IT system. To remove the existing client PC from the license allocation:
- Login as an Engineer-level user:
- On the menu click Tools > Manage Locations…
- In the client machine list at the bottom of the screen, select the client PC name that you wish to remove. (Hint: Multiple entries can be selected by using Shift- and Ctrl-select key combinations)
- Click Remove.
- The selected client entries will be removed. (Note: If the wrong client PC was removed it will automatically be re-added the next time CashView is used from that client PC. If this happens, check that the client PC is set to the correct location)
If you require additional CashView clients and have reached your license allocation, please contact Volumatic.


